The delicate artistry of feather carving offers a unique pathway to crafting exquisite jewelry. Imagine transforming a simple bird feather into a stunning, wearable piece—a bracelet that whispers of nature's elegance and your own creative skill. This captivating craft, while seemingly intricate, is surprisingly accessible, requiring only a few basic tools and a patient hand. The intricate details and subtle curves of a feather lend themselves beautifully to the delicate process of carving, creating a piece of jewelry that's both beautiful and deeply personal. From selecting the perfect feather to achieving a polished finish, the journey is as rewarding as the final product.
This comprehensive guide will take you step-by-step through the process of carving a feather bracelet, from preparation and design to finishing techniques. We'll cover everything you need to know, from choosing the right tools and materials to mastering the essential carving techniques, ensuring you create a beautiful and lasting piece of wearable art. Let's begin!
Preparation and Safety Guidelines
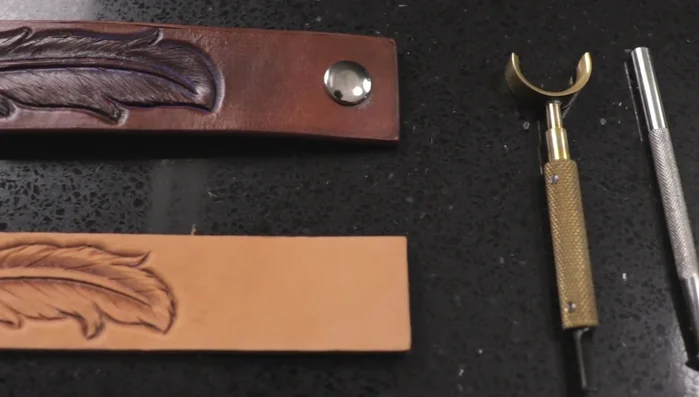
- Berry King 3/8 barrel quarter inch thin straight blade
- Eraser
- Barry King check bevelers (number two)
- Swivel knife
- Always use sharp, well-maintained carving tools. Dull tools require more force, increasing the risk of slips and injuries.
- Wear safety glasses to protect your eyes from flying debris.
- Work in a well-ventilated area, as some carving materials may release fumes.
Step-by-Step Instructions
Cut and Shape the Feather
- Wet the leather and cut out the feather pattern using a Berry King 3/8 barrel quarter inch thin straight blade. Ensure the lines taper, starting deep and tapering off.
Prepare the Leather
- Lightly erase any remaining pencil marks.
Bevel the Edges
- Bevel the edges using a Barry King check beveler (number two). Start on the main stem and work your way out, applying heavier pressure at the end of the line and lighter pressure at the beginning. Ensure the leather is not too wet.

Bevel the Edges Create Feather Texture
- Scribble lines onto the leather at a 45-degree angle from the stem, creating a rough texture. Don't make the lines too precise; cross over them for a feathery look.
- Use a vertical lined thumbprint tool at a 45-degree angle, applying heavier pressure towards the stem and lightening up towards the tip. Aim for deep impressions to enhance color.
Create Feather Texture Detail the Feather
- Dress up the feather with a swivel knife. High-center the knife over the edge, cut back, twist it out, and fray the edge randomly throughout the feather. Cut deep from the middle and lighten up, maintaining a 45-degree angle. Line these cuts up across from each other.
- Make a few small cuts at the bottom for a fuzzy effect.
Detail the Feather Finishing Touches
- Add snaps and finish the edges.
Finishing Touches


Read more: DIY Crystal Bracelet: Easy Square Knot Tutorial
Tips
- Don't be afraid to hit the leather hard enough while beveling to hear a good sound; it indicates you are doing it correctly.
- If the leather is not wet enough, add more water.